The pen tool is one of the most useful tools in photoshop, you can easily make custom shapes for selections, stroking, fill paths and more by using the lines and curves that use mathematical statements and points in order to define their shape and other characteristics, wich makes them very scalable so that the quality will not be lost when changing the scale.
The Basic movement
Open a 250x300px file.
Now select the pen tool, you will find it in the tool bar above the text tool (as long as you're using cs5).
You should see something like this in the top(if not change the settings):
Now well be doing everthing in this tutorial with these settings.
Lets start with makin a curve in a line. First make an anchor point by clicking somewhere on your canvas like this:


Now we can do a lot of things with this on line, but I'll tell more about it later in this tutorial.
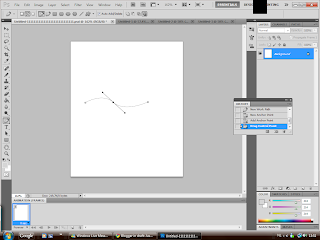
First we are going to add an anchor point in the middle, to do so you have to right click in the middle and select the option 'Add anchor point'. It wil look like this:

You will see three new spots, the middle on is the anchor point itself, you can move it while pressing the Ctrl button. The other two determine the curve in the different parts of the line, so when we move them (while pressing the control button) the line will start to curve the way you want it, like this:
When you want to move just one part of the line, then hold Alt while moving the spot on the side wich you want to curve like this:

When you dont want to see your path anymore just press enter.
What can you do with the Pen tool?
Now that you can freely make any curved line you want in photoshop, it's time to talk about the possible uses of this line. Open another file with the same size as before, and make a nice symbol or something in that area, I'm going to go with a J from JustPhotoshopping:

Now I want that to become an actual line in pixels, so first I'm going to select what kind of stroke I want, I'm going for a nice orange 5px pencil stroke, so I'll change my settings to this:

I'm want the stroke to go exactly over the line I made, so I'm going to go to the pen tool, right click and select the stroke option (and choose the pencil):
Now I'm goin to fill it with a green color. I so I'm going to go to the pen tool, right click and select the fill option:

Make sure you have these settings and then click ok, it'll look like this if you did it right:

Notice that it filled exactly inside of your path, while the stroke option goes around it.
Say you still want to edit the green color (and leave the yellow color the way it is), you could use the make selection option in the Pen tool and it will select the content of your path.
Now I've made my J with the pen tool. Even though this was a very low quality example, but you can make very nice logos or drawings with this tool!
I hope you enjoyed this basic tutorial of the pen tool, and see you tommorow!

You will see three new spots, the middle on is the anchor point itself, you can move it while pressing the Ctrl button. The other two determine the curve in the different parts of the line, so when we move them (while pressing the control button) the line will start to curve the way you want it, like this:

When you want to move just one part of the line, then hold Alt while moving the spot on the side wich you want to curve like this:

When you dont want to see your path anymore just press enter.
What can you do with the Pen tool?
Now that you can freely make any curved line you want in photoshop, it's time to talk about the possible uses of this line. Open another file with the same size as before, and make a nice symbol or something in that area, I'm going to go with a J from JustPhotoshopping:

Now I want that to become an actual line in pixels, so first I'm going to select what kind of stroke I want, I'm going for a nice orange 5px pencil stroke, so I'll change my settings to this:
I'm want the stroke to go exactly over the line I made, so I'm going to go to the pen tool, right click and select the stroke option (and choose the pencil):
Now I'm goin to fill it with a green color. I so I'm going to go to the pen tool, right click and select the fill option:

Make sure you have these settings and then click ok, it'll look like this if you did it right:

Notice that it filled exactly inside of your path, while the stroke option goes around it.
Say you still want to edit the green color (and leave the yellow color the way it is), you could use the make selection option in the Pen tool and it will select the content of your path.
Now I've made my J with the pen tool. Even though this was a very low quality example, but you can make very nice logos or drawings with this tool!
I hope you enjoyed this basic tutorial of the pen tool, and see you tommorow!
No comments:
Post a Comment